Using the scanners for my 5x4 film
I have tried two types of scanner; the Imacon Flextight Precision II & III and the Epson V750 Pro.
First I tried out the Imacon machine. I actually found this the easiest to use out of the two; the process of putting it into the scanner is much more simple in my opinion.
To start scanning with the scanner, turn it on and log in to the corresponding computer. Open the flexcolour software which is what we use to scan the images. To begin the process put in your sheet of developed film into the magnetic holder and ensure any dust has been blown off using the blow tool located next to the scanners. it's best to use this scanner while not wearing any fluffy clothing as it will get on your negative and give you even more post production work to do.
Now that the negative is in the holder you can place it into the machine like so;


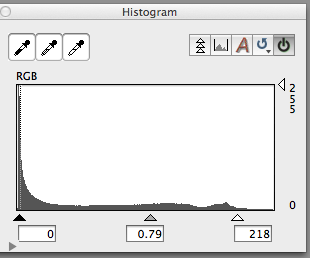
I then opened up the histogram and picked the neutraliser tool.

To use this tool I picked the most neutral grey area of the image, which was the bottom of the concrete statue on the floor which allowed for the tones in the image to adjust themselves using that mid grey point as a base.
I then changed the levels by moving the highlights arrow down. This process just allows you to change the tone of the image to suit how you like it.


For more image I simply changed the levels and did minor corrections.
After this you can click 'scan' and it will take your negative and scan it. This will take longer than the initial scan because the preview wasnt a high quality.


This is the result from the imacon scan. I can now use this as a base for further processing. The scan is high quality and it's highly satisfying to see my focus was okay. I did unfortunately scratch the negative which can be seen in the scan however these can be edited out.
I could have adjusted the settings a little better as there's lots of areas which are pure black, however this does cause a nice contrast and if i'm unsatisfied it's easy to rescan.
Next I used the Epson scanner.
I actually found this harder to set up than the imacon because getting the negative into the holder is much more difficult.
The holder has two slots and needs to be placed inside the scanner using certain notches in the right places.
 Where you see the notches coming out of the top of the film holder is where you must match with the indents on the scanner. This stops the film holder from moving and compromising your scan.
To scan, we first need to open the epson scan software and turn on the scanner.
Put the film in the holder, blow off the dust using a blow tool. To reduce the amount of marks of your negative be sure to hold it by the sides rather than having your finger directly on the negative plane. Place the holder inside the scanner as previously discussed.
If the scanner hasn't been used in a while it may also benefit you to blow off any dust on the actual glass of the scanner, however this wont be necessary all the time, for example if you're scanning multiple negatives.
One the film holder is securely in, close the lid of the scanner and head to the software.

I first changed the settings before I did any type of scan. I changed the mode to 'professional' to give me more freedom with my settings.
The document type needs to be the size of film, for me it was film film holder, and also changed the film type to 'black and white negative' as that correlated with what I shot on.
I set the image type as 48-bit colour and then the resolution at 2400 dpi to create a high quality image. I could have gone higher but the difference would become very minimal, especially when printing.
The smaller the resolution the smaller the file size is and so 2400 dpi worked perfectly for me.
I unchecked 'unsharp mask', as it's best to do this in post production if you really want it and have far more control over it.
Lastly I went to 'Configuration...' and select the appropriate film size.
At this point we can now select 'preview' and it will do the brief scan as the Imacon did.

Now make a selection box around your scanned negative to tell the scanner to only scan that area as we dont need the film holder in our final image.
I was actually pretty happy with how this preview of the scan looked so i clicked 'scan' to tell the machine to do the scan properly. When I clicked this the software asked me to choose a place to save the final image to and a name to call the scan. Press 'okay' and then it will begin the scanning process. Once it's done it will save to your chosen location.

This image is actually a screenshot of the actual image because the file size was too large for the website.
The image is very high quality, and again has very visible scratches from the development of the negative.
I prefer the toning of the image than the scan from the imacon scanner but that's my fault and not the scanner's. Quality wise I believe them so be quite on par with each other.
However I do believe i'd find myself using the imacon over the epson because of the ease of use and general preference.
First I tried out the Imacon machine. I actually found this the easiest to use out of the two; the process of putting it into the scanner is much more simple in my opinion.
To start scanning with the scanner, turn it on and log in to the corresponding computer. Open the flexcolour software which is what we use to scan the images. To begin the process put in your sheet of developed film into the magnetic holder and ensure any dust has been blown off using the blow tool located next to the scanners. it's best to use this scanner while not wearing any fluffy clothing as it will get on your negative and give you even more post production work to do.
Now that the negative is in the holder you can place it into the machine like so;

Next on Flexcolor you need to set the settings to be appropriate for your scan. For me it was like so;

2040 pixels per inch (PPI) allows for the image to be of high quality. As this scan is essentially our RAW files for film it's important we get as much information into our scan as possible.
Then click 'preview' and the machine will do a brief scan to show you how the image will look.
It's at this point where you get to change some things in the scan and make minor adjustments.
For my own scan, I first made a selection box around the centre of the image before making my changes. This is so the adjustments primarily affect that area.


To use this tool I picked the most neutral grey area of the image, which was the bottom of the concrete statue on the floor which allowed for the tones in the image to adjust themselves using that mid grey point as a base.
I then changed the levels by moving the highlights arrow down. This process just allows you to change the tone of the image to suit how you like it.

After this you can click 'scan' and it will take your negative and scan it. This will take longer than the initial scan because the preview wasnt a high quality.
This is the result from the imacon scan. I can now use this as a base for further processing. The scan is high quality and it's highly satisfying to see my focus was okay. I did unfortunately scratch the negative which can be seen in the scan however these can be edited out.
I could have adjusted the settings a little better as there's lots of areas which are pure black, however this does cause a nice contrast and if i'm unsatisfied it's easy to rescan.
Next I used the Epson scanner.
I actually found this harder to set up than the imacon because getting the negative into the holder is much more difficult.
The holder has two slots and needs to be placed inside the scanner using certain notches in the right places.

To scan, we first need to open the epson scan software and turn on the scanner.
Put the film in the holder, blow off the dust using a blow tool. To reduce the amount of marks of your negative be sure to hold it by the sides rather than having your finger directly on the negative plane. Place the holder inside the scanner as previously discussed.
If the scanner hasn't been used in a while it may also benefit you to blow off any dust on the actual glass of the scanner, however this wont be necessary all the time, for example if you're scanning multiple negatives.
One the film holder is securely in, close the lid of the scanner and head to the software.
I first changed the settings before I did any type of scan. I changed the mode to 'professional' to give me more freedom with my settings.
The document type needs to be the size of film, for me it was film film holder, and also changed the film type to 'black and white negative' as that correlated with what I shot on.
I set the image type as 48-bit colour and then the resolution at 2400 dpi to create a high quality image. I could have gone higher but the difference would become very minimal, especially when printing.
The smaller the resolution the smaller the file size is and so 2400 dpi worked perfectly for me.
I unchecked 'unsharp mask', as it's best to do this in post production if you really want it and have far more control over it.
Lastly I went to 'Configuration...' and select the appropriate film size.
At this point we can now select 'preview' and it will do the brief scan as the Imacon did.

Now make a selection box around your scanned negative to tell the scanner to only scan that area as we dont need the film holder in our final image.
I was actually pretty happy with how this preview of the scan looked so i clicked 'scan' to tell the machine to do the scan properly. When I clicked this the software asked me to choose a place to save the final image to and a name to call the scan. Press 'okay' and then it will begin the scanning process. Once it's done it will save to your chosen location.
The image is very high quality, and again has very visible scratches from the development of the negative.
I prefer the toning of the image than the scan from the imacon scanner but that's my fault and not the scanner's. Quality wise I believe them so be quite on par with each other.
However I do believe i'd find myself using the imacon over the epson because of the ease of use and general preference.


Comments
Post a Comment